
- Extensão Adobe Extension Information File (.mxi).
- O Adobe Extension Manager instalado em sua maquina para poder gerar o arquivo.
- Os GIFs dos ícones que você quer colocar.
- Um HTML para cada ligação do seu ícone.

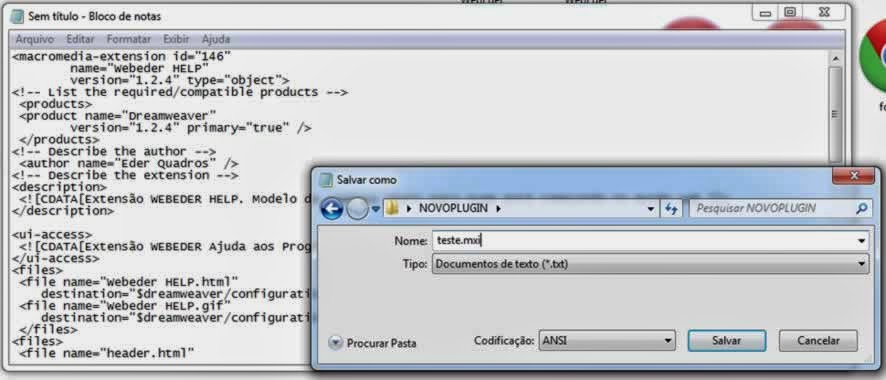
2º Abra o bloco de notas e copie o código abaixo e salve como extensão “.mxi” sem aspas.
<macromedia-extension id="146"
name="Webeder HELP"
version="1.2.4" type="object">
<!-- List the required/compatible products -->
<products>
<product name="Dreamweaver"
version="1.2.4" primary="true" />
</products>
<!-- Describe the author -->
<author name="Eder" />
<!-- Describe the extension -->
<description>
<![CDATA[Extensão WEBEDER HELP. Modelo de códigos para quem está começando no mundo web ]]>
</description>
<ui-access>
<![CDATA[Extensão WEBEDER Ajuda aos Programadores e Designers escreverem menos e fazer muito mais. ]]>
</ui-access>
<files>
<file name="Webeder HELP.html"
destination="$dreamweaver/configuration/objects/common/webeder" />
<file name="Webeder HELP.gif"
destination="$dreamweaver/configuration/objects/common/webeder" />
</files>
<files>
<file name="header.html"
destination="$dreamweaver/configuration/objects/common/webeder" />
<file name="header.gif"
destination="$dreamweaver/configuration/objects/common/webeder" />
</files>
<files>
<file name="print.html"
destination="$dreamweaver/configuration/objects/common/webeder" />
<file name="print.gif"
destination="$dreamweaver/configuration/objects/common/webeder" />
</files>
<files>
<file name="switch.html"
destination="$dreamweaver/configuration/objects/common/webeder" />
<file name="switch.gif"
destination="$dreamweaver/configuration/objects/common/webeder" />
</files>
<files>
<file name="get.html"
destination="$dreamweaver/configuration/objects/common/webeder" />
<file name="get.gif"
destination="$dreamweaver/configuration/objects/common/webeder" />
</files>
<files>
<file name="foreach.html"
destination="$dreamweaver/configuration/objects/common/webeder" />
<file name="foreach.gif"
destination="$dreamweaver/configuration/objects/common/webeder" />
</files>
<files>
<file name="for.html"
destination="$dreamweaver/configuration/objects/common/webeder" />
<file name="for.gif"
destination="$dreamweaver/configuration/objects/common/webeder" />
</files>
<files>
<file name="e-mail.html"
destination="$dreamweaver/configuration/objects/common/webeder" />
<file name="e-mail.gif"
destination="$dreamweaver/configuration/objects/common/webeder" />
</files>
<files>
<file name="Iframe.html"
destination="$dreamweaver/configuration/objects/common/webeder" />
<file name="Iframe.gif"
destination="$dreamweaver/configuration/objects/common/webeder" />
</files>
<!-- Describe the changes to the configuration -->
</macromedia-extension>
3º Crie em seu editor de um HTML e digite o seu código por exemplo:
<iframe src="https://www.seudomínio.com.br/SEU LINK AQUI" name="NOME" width="LARGURA" height="ALTURA" scrolling="auto" frameborder="no">
Temos um iframe então salvamos como iframe.html
Dentro do nosso .mxi
Nas linhas files.
<files>
<file name="Iframe.html"
destination="$dreamweaver/configuration/objects/common/webeder" />
<file name="Iframe.gif"
destination="$dreamweaver/configuration/objects/common/webeder" />
</files>
<file name="Iframe.html"
destination="$dreamweaver/configuration/objects/common/webeder" />
<file name="Iframe.gif"
destination="$dreamweaver/configuration/objects/common/webeder" />
</files>

- Nome o html exemplo - "Iframe.html"
- Destination: o destino deixe como está alterando somente o nome da pasta e arquivo depois de common exemplo: "webeder"
- E no próximo name será a imagem gif exemplo: "Iframe.gif"
4º Então abrimos o Extension monager CS6 e abrimos o arquivo .mxi
Depois de criado o pacote é só instalar indo em "instalar extensão".
Nota: Outra coisa muito útil é pegar extensões antigas e converter para que funcione no dreamweaver mais novo #ficaadica.
Comentários
Postar um comentário